
Adding a Certificate to Your Course
A certificate is the record a learner receives when they successfully complete your course. It carries their name, the course title, your organisation, your signatories, and a unique certificate ID that anyone can use to verify it.
What a certificate depends on
Section titled “What a certificate depends on”Four things have to be in place before a learner receives one:
-
A grading policy with a pass threshold. The certificate is issued to learners whose final grade lands above the Fail band. See Setting Up Grading.
-
A certificate configured for the course, and set to Active. That’s what this article covers.
-
A certificate template, created by your platform admin. See Platform Setup, Branding & Certificate Templates.
-
The learner actually passing. Certificates generate automatically once a learner’s grade crosses the threshold.
Note: Certificate templates are created and branded at the platform level by an admin, not inside a course. As a course author you select from the templates that already exist.
Creating a certificate
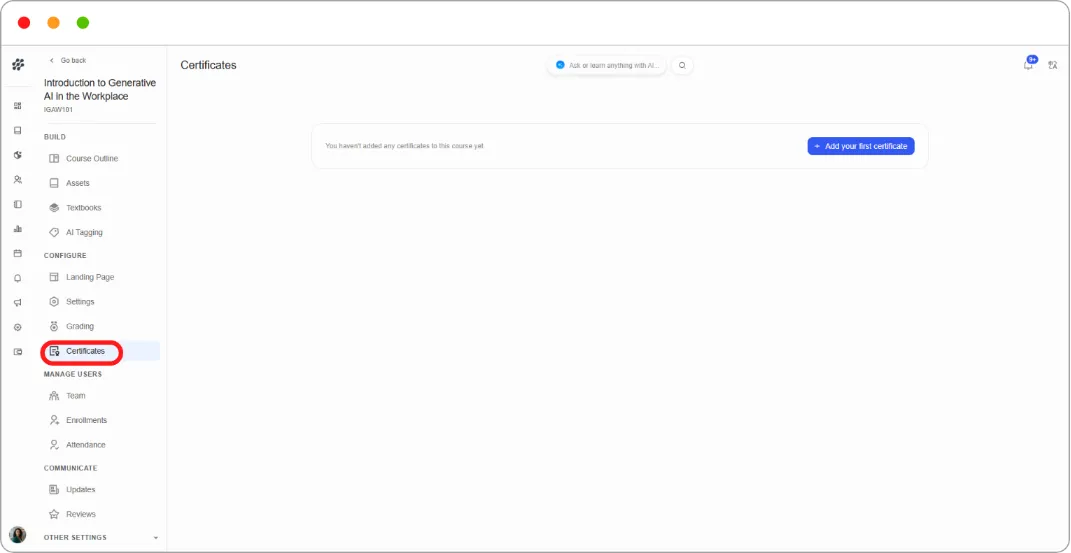
Section titled “Creating a certificate”- Open the course, then under CONFIGURE in the left navigation, click Certificates.
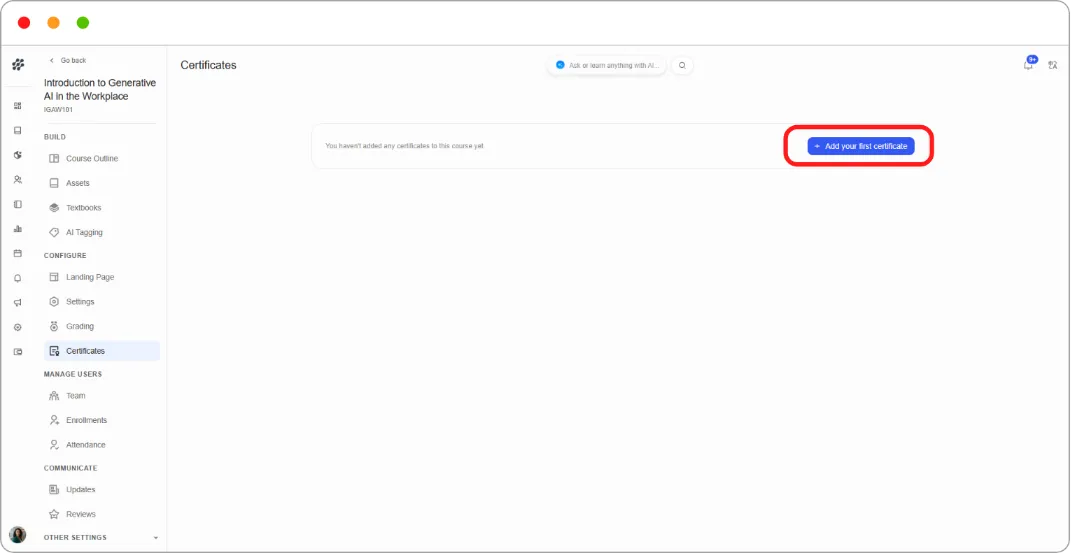
- Click + Add certificate.
-
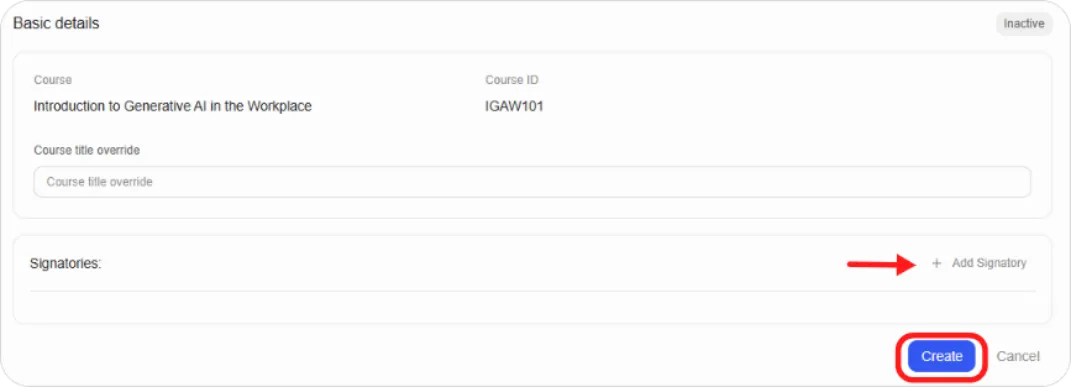
In Basic details, the Course name and Course ID are filled in and can’t be edited.
-
Optionally enter a Course title override. Use this when the name on the certificate should differ from the course name in the platform, for example a shorter or more formal title.
-
Add at least one signatory (below).
-
Click Create.
The certificate is created as Inactive. It won’t be issued until you activate it.
Adding a signatory
A signatory is the person whose name and signature appear on the certificate.
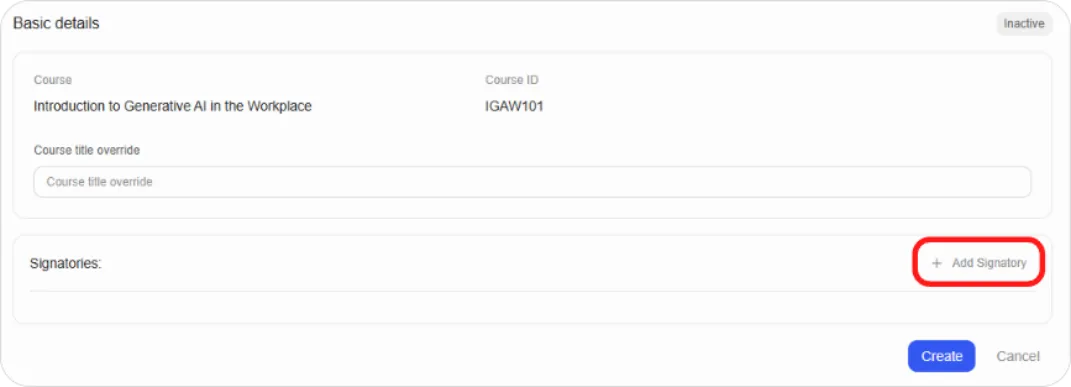
- Click + Add Signatory.
-
In Add Signature, enter:
-
Name — for example, Daniel
-
Title — their role, for example HOD
-
Organization — for example, Blend-ed
-
-
Upload the signature image. Drag and drop a file or click Upload Image. PNG, JPG, JPEG, and WEBP are accepted, up to 20 MB.
-
Click Add Signature.
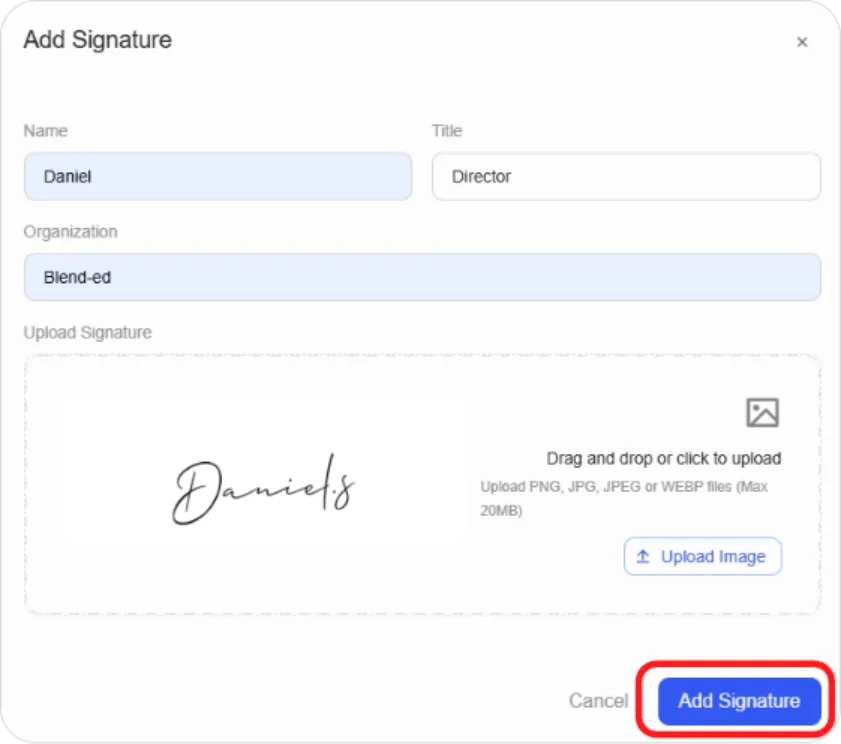
Repeat for each signatory. Once added, each appears in the Signatories list with a pencil icon to edit and a trash icon to remove.
Tip: Use a signature image with a transparent background. A signature on a white rectangle sits awkwardly on a designed certificate.
Activating a certificate
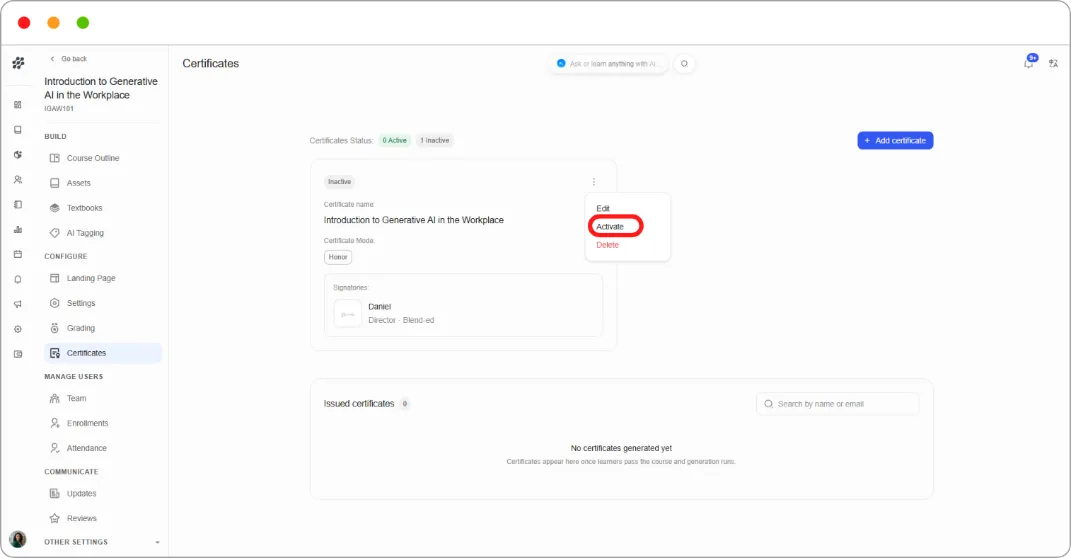
Section titled “Activating a certificate”Certificates only issue when active. The page header shows a running count of Active and Inactive certificates.
Open the ⋮ menu on the certificate card to activate it.
Once active, the card gains two things:
-
A preview icon, for seeing the certificate as a learner will.
-
A Certificate Template dropdown, for choosing which of your organisation’s templates this course uses.
Tip: Preview before you leave the page. Signature images and long course titles are the two things that most often look wrong, and both are quick to fix before anyone earns a certificate rather than after.
Certificate mode
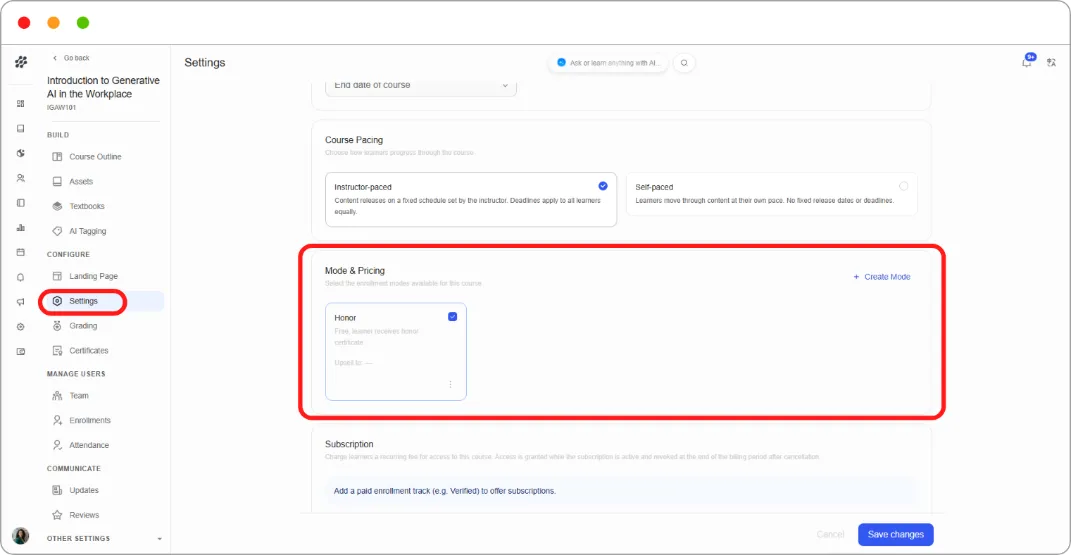
Each certificate card shows a Certificate Mode, matching an enrolment mode on the course. The default is Honor, a free enrolment where the learner receives an honor certificate. Modes are managed under CONFIGURE > Settings > Mode & Pricing.
Controlling when certificates appear
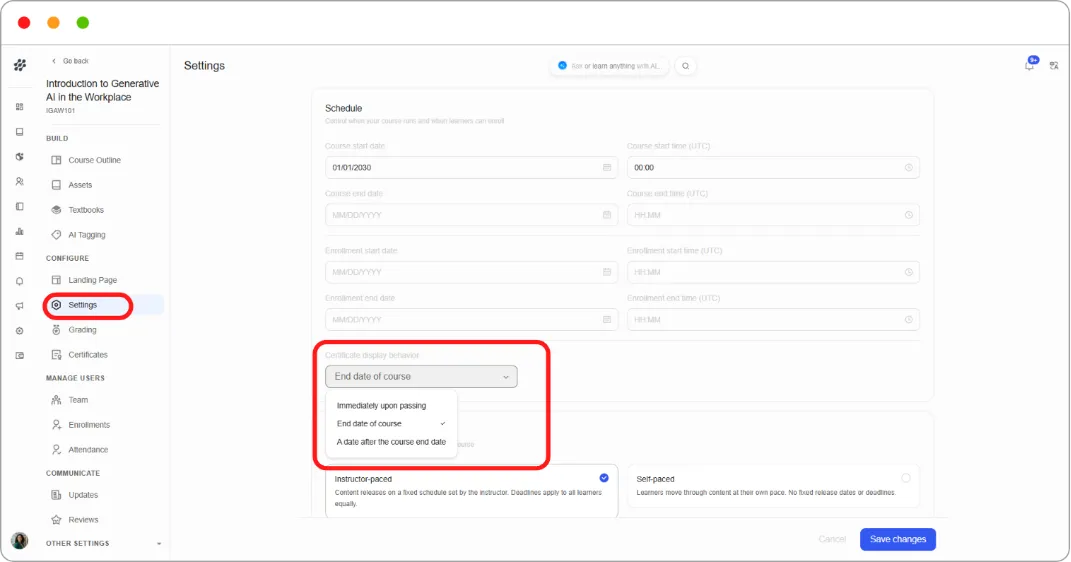
Section titled “Controlling when certificates appear”Learners don’t have to see their certificate the moment they pass. Set the timing under CONFIGURE > Settings, in the Certificate display behavior dropdown:
| Option | When learners see it |
|---|---|
| Immediately upon passing | As soon as their grade crosses the threshold |
| End date of course | When the course end date is reached |
| A date after the course end date | On a date you specify |
Tip: Immediately upon passing suits self-paced courses, where learners finish at different times and waiting serves no purpose. Instructor-paced cohorts often prefer the end date, so everyone receives theirs together and late grade adjustments are still possible.
Tracking issued certificates
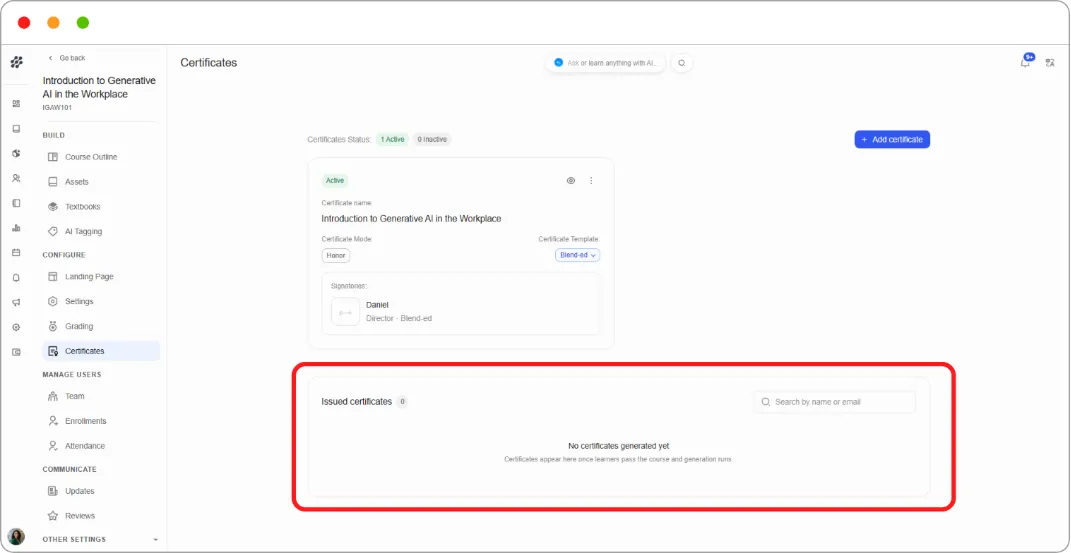
Section titled “Tracking issued certificates”The Issued certificates panel at the bottom of the Certificates page lists every certificate generated for the course, with a count and a search box for finding a learner by name or email.
Before anyone passes, it reads No certificates generated yet, with a note that certificates appear once learners pass the course and generation runs.
What learners receive
Section titled “What learners receive”A learner who passes sees a confirmation on their dashboard and can open their certificate, which shows:
-
Their name
-
Confirmation they completed the course, and the organisation offering it
-
Each signatory’s signature, name, and title
-
The date of issue
Below the certificate is an accomplishment panel with the learner’s profile, a Certificate ID Number, the issue date, buttons to share to X or LinkedIn, and Download PDF.
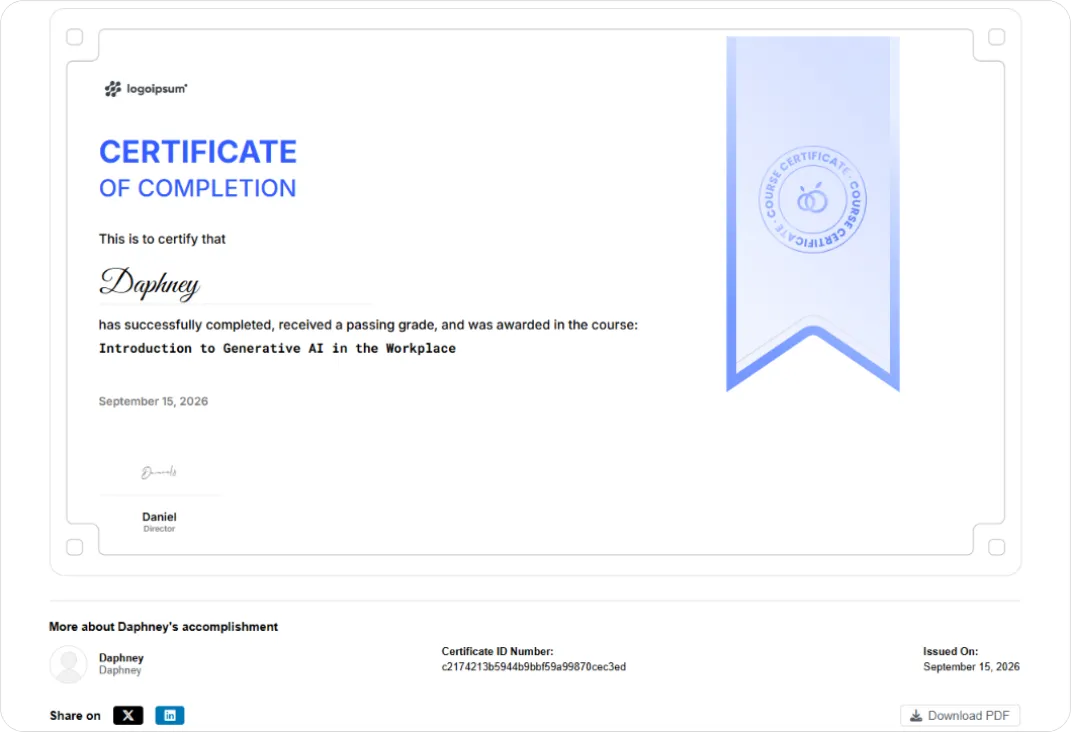
The Certificate ID Number is what makes the certificate verifiable. Anyone given the certificate’s link can confirm it’s real, which matters for learners putting it in front of an employer.
Before you publish
Section titled “Before you publish”-
The grading policy is set and the pass threshold is where you want it.
-
The certificate exists and is Active.
-
A certificate template is selected.
-
All signatories have their name, title, organisation, and signature image.
-
You’ve previewed the certificate and it looks right.
-
Certificate display behavior matches how the course runs.
Common problems
Section titled “Common problems”Learners passed but got no certificate. The certificate is probably still Inactive. Check the Active count at the top of the page.
The certificate shows the wrong title. Set a Course title override in the certificate’s details.
No template in the dropdown. Templates are created by your platform admin. See Platform Setup, Branding & Certificate Templates.
Nobody is passing. The issue is in the grading policy rather than here. Check the pass threshold and confirm your graded subsections have assignment types set. See Setting Up Grading.
What’s next
Section titled “What’s next”-
Set the pass threshold that determines who qualifies: Setting Up Grading
-
Create and brand certificate templates (admin): Platform Setup, Branding & Certificate Templates