
Managing Assets
Assets are the files your courses are built from: videos, documents, and images. Blend-ed stores them in two separate places, and which one you use determines where the file can be reused.
| Platform assets | Course assets | |
|---|---|---|
| Where | Authoring > Assets | Inside a course, BUILD > Assets |
| Scope | Every course on the platform | That one course only |
| Holds | Videos and documents | Files used in this course, including images |
| Best for | Shared video libraries, reference documents, anything used more than once | Course-specific images, handouts, and one-off files |
Rule of thumb: if you’ll use a file in more than one course, put it in platform assets. If it belongs to a single course, keep it in that course.
Part 1: Platform assets
Section titled “Part 1: Platform assets”Platform assets sit outside any individual course, so anything stored here can be pulled into any course you build.
Finding the library
From the main left navigation, click Authoring, then open the Assets tab.
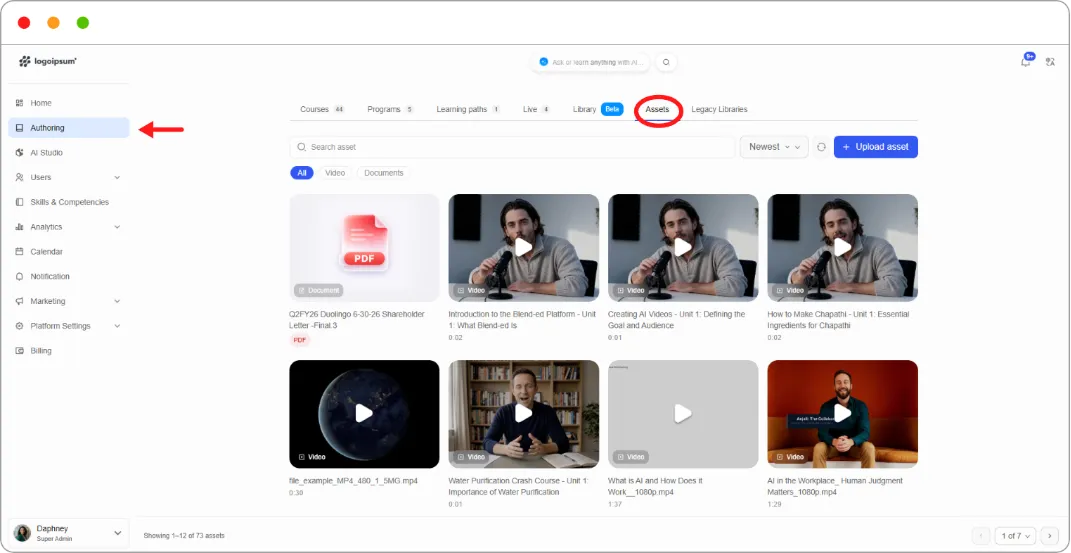
Assets display as a grid of cards, each showing a thumbnail, the asset name, a Video or Document badge, and video duration. To find something:
-
Search asset — search by name.
-
All / Video / Documents — filter by type.
-
Newest — change the sort order.
-
Page through the library using the controls at the bottom right.
Uploading an asset
-
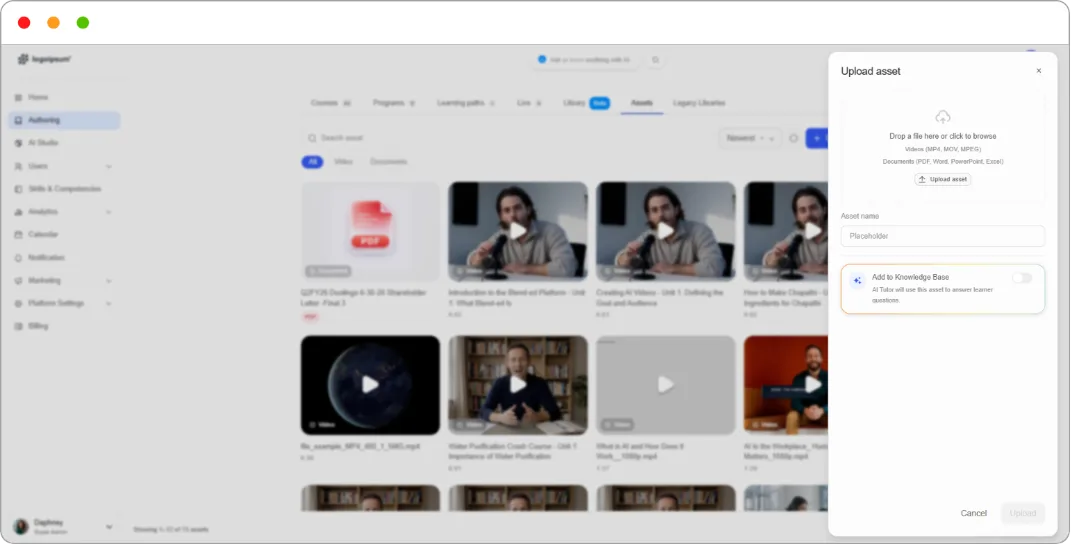
Click + Upload asset. A panel opens on the right.
-
Drag a file onto the drop zone, or click Upload asset to browse.
-
Enter an Asset name. This is what you’ll search for later, so name it properly rather than leaving the filename.
-
Decide whether to switch on Add to Knowledge Base (see below).
-
Click Upload.
Supported formats
-
Videos — MP4, MOV, MPEG
-
Documents — PDF, Word, PowerPoint, Excel
Add to Knowledge Base
Switching this on makes the asset available to the AI Tutor, which will draw on it when answering learner questions.
This is one of the more useful things you can do with a document. A policy manual, a technical reference, or a set of guidelines added to the Knowledge Base means learners get accurate answers grounded in your own material rather than generic ones.
You can also turn this on later from the asset’s details panel.
Tip: Be deliberate about what goes in. The Knowledge Base shapes what the AI Tutor tells your learners, so add authoritative material and leave out drafts, internal notes, and anything out of date.
Asset details
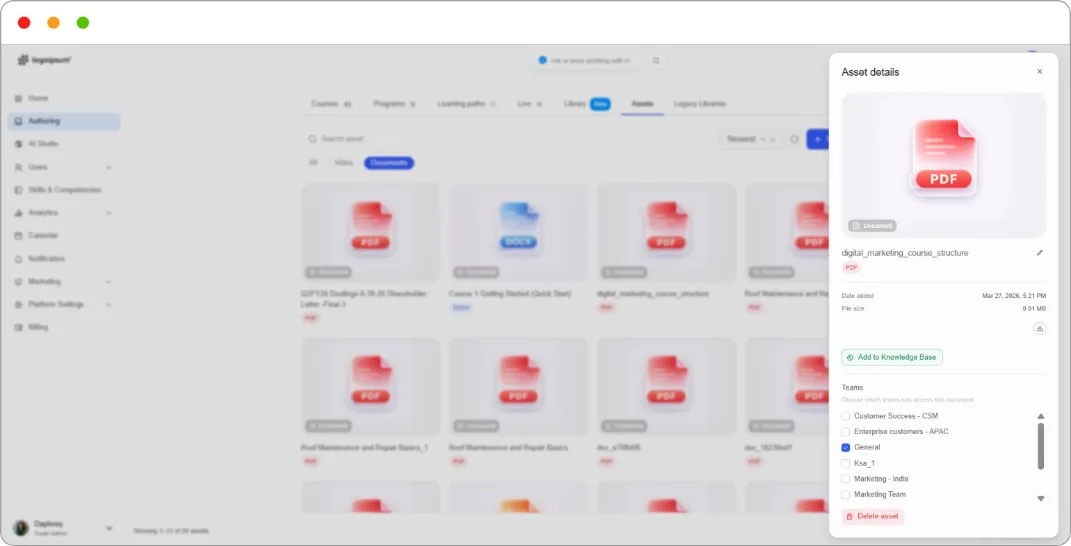
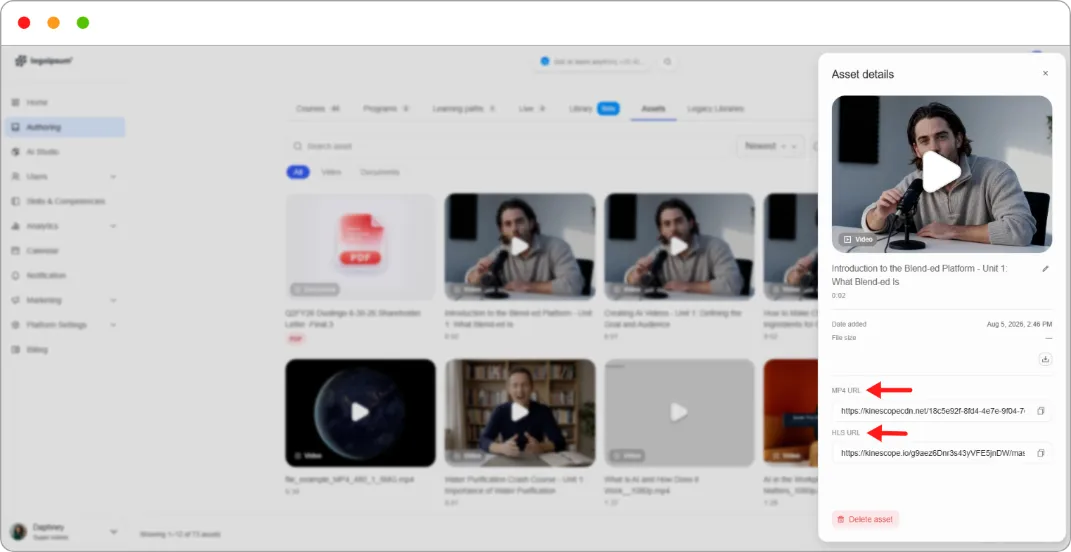
Click any asset to open its details panel. Both file types show the asset name with a pencil icon to rename, the date added, file size, a download icon, and Delete asset. The rest depends on the type.
For documents:
-
Add to Knowledge Base — make the document available to the AI Tutor.
-
Teams — choose which teams can access this document, using the checkboxes.
-
Web URL — the public link to the file, with a copy button.
-
Studio URL — the internal path used inside course components, with a copy button.
For videos:
-
MP4 URL — a direct link to the video file, with a copy button.
-
HLS URL — a streaming link, with a copy button.
Using a platform video in a course
Two routes, both starting from a Video component in a unit:
From the library (simplest):
-
Add or edit a Video component.
-
Click Select a video from library.
-
Search or browse, then click the video you want.
-
Click Save.
By URL:
-
In Authoring > Assets, open the video and copy its MP4 URL.
-
Add or edit a Video component in your unit.
-
Paste the URL into the Video URL field.
-
Click Save.
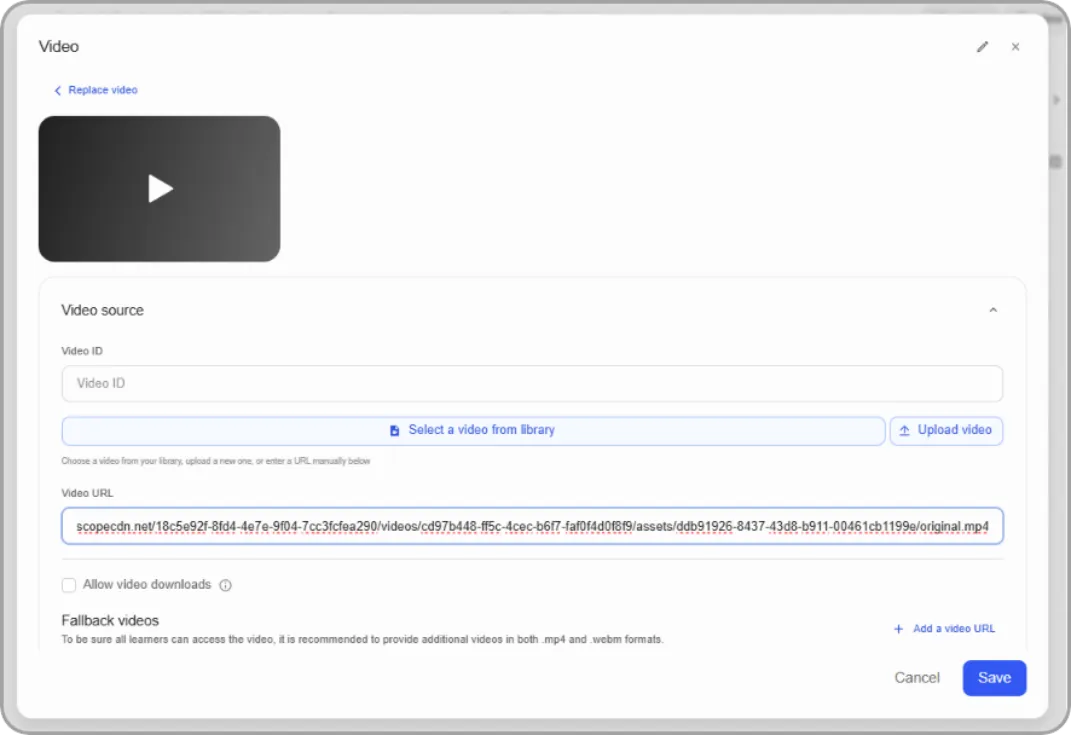
Both give the same result. The library picker is faster; the URL route is useful when you’re setting up several components at once and already have the link.
Using documents in AI Studio
Documents in your platform library can also be used as source material when generating a course with AI Studio. See How to Create a Course with AI Studio.
Part 2: Course assets
Section titled “Part 2: Course assets”Every course has its own asset area holding files used only in that course. This is where images live, and where files uploaded from inside a component end up.
Finding it
Open the course, then under BUILD in the left navigation, click Assets.
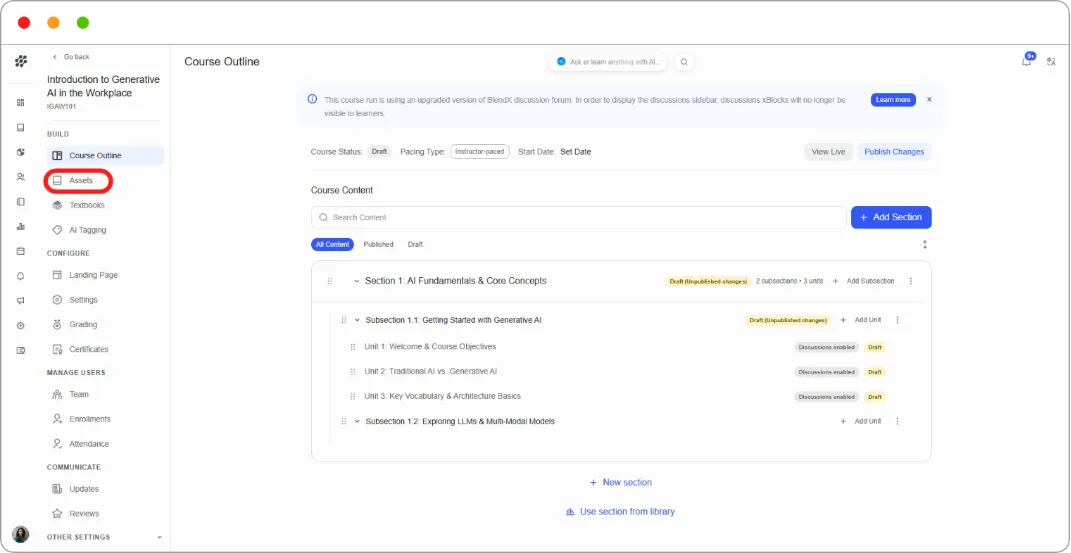
Files display in a table:
| Column | What it shows |
|---|---|
| FILE NAME | The file, with a thumbnail |
| TYPE | Image, Document, and so on |
| ACTIVE | Whether the file is currently used somewhere in this course. Files marked Inactive aren’t referenced by any component |
| ACCESS | Whether the file is locked |
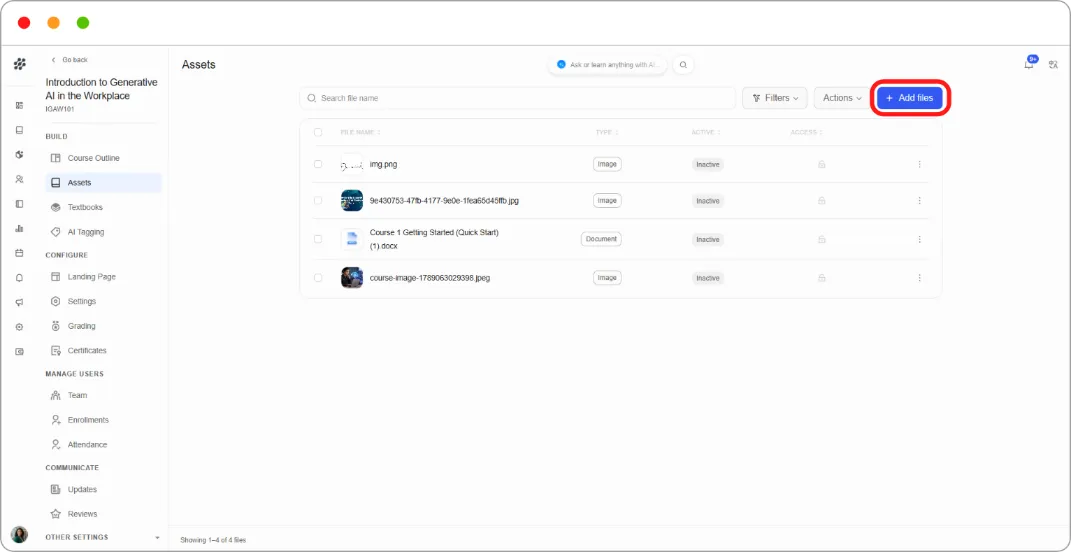
Above the table: Search file name, Filters, Actions for bulk operations on selected files, and + Add files.
Adding files
-
Click + Add files.
-
Select one or more files from your computer.
-
They upload straight into the course.
Managing a file
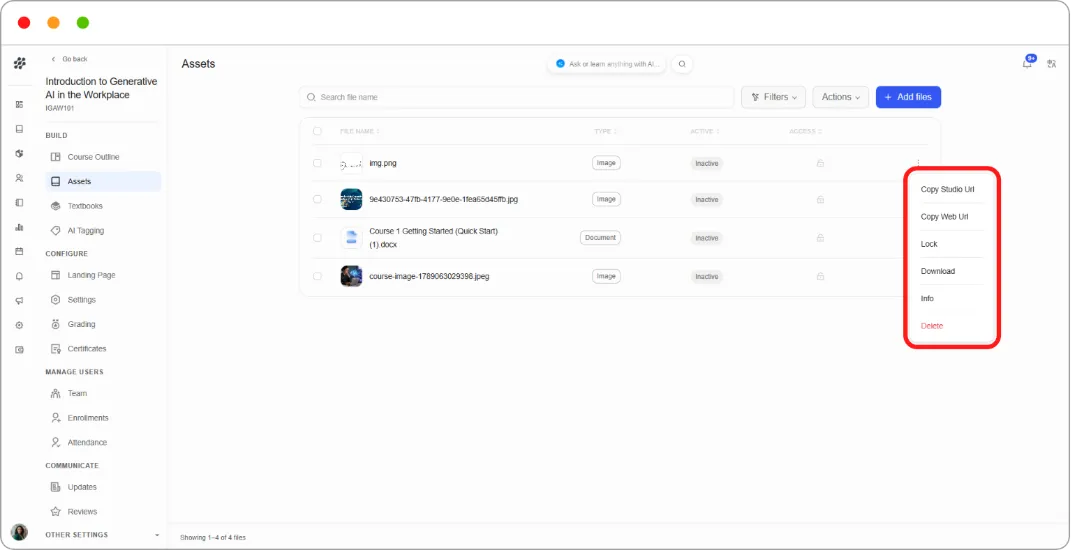
Click the ⋮ menu at the end of any row:
| Option | What it does |
|---|---|
| Copy Studio Url | Copies the internal path for use inside components |
| Copy Web Url | Copies the public link |
| Lock | Restricts the file to enrolled learners |
| Download | Downloads the file |
| Info | Opens the file’s details |
| Delete | Removes the file from the course |
Tip: Lock files that shouldn’t circulate outside the course. An unlocked file’s Web URL works for anyone who has it, enrolled or not.
Note: Check the ACTIVE column before deleting anything. Deleting an active file breaks whichever component points at it, and the component won’t warn you.
Using assets inside components
Section titled “Using assets inside components”Adding an image to a Text component
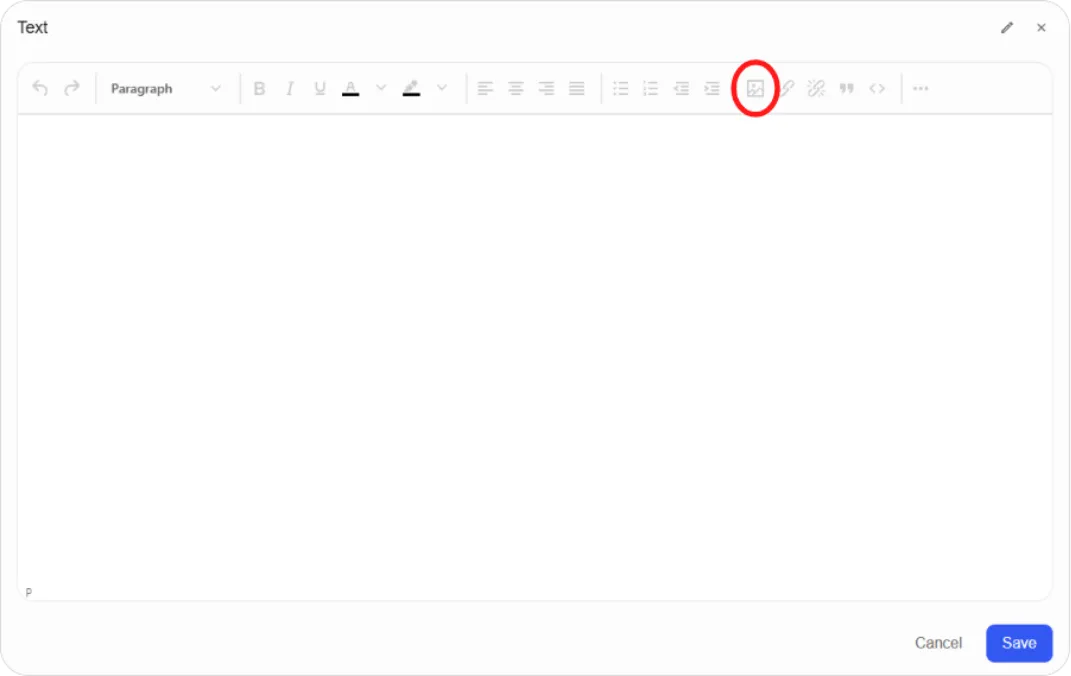
- Edit a Text component and click the insert image icon in the toolbar.
-
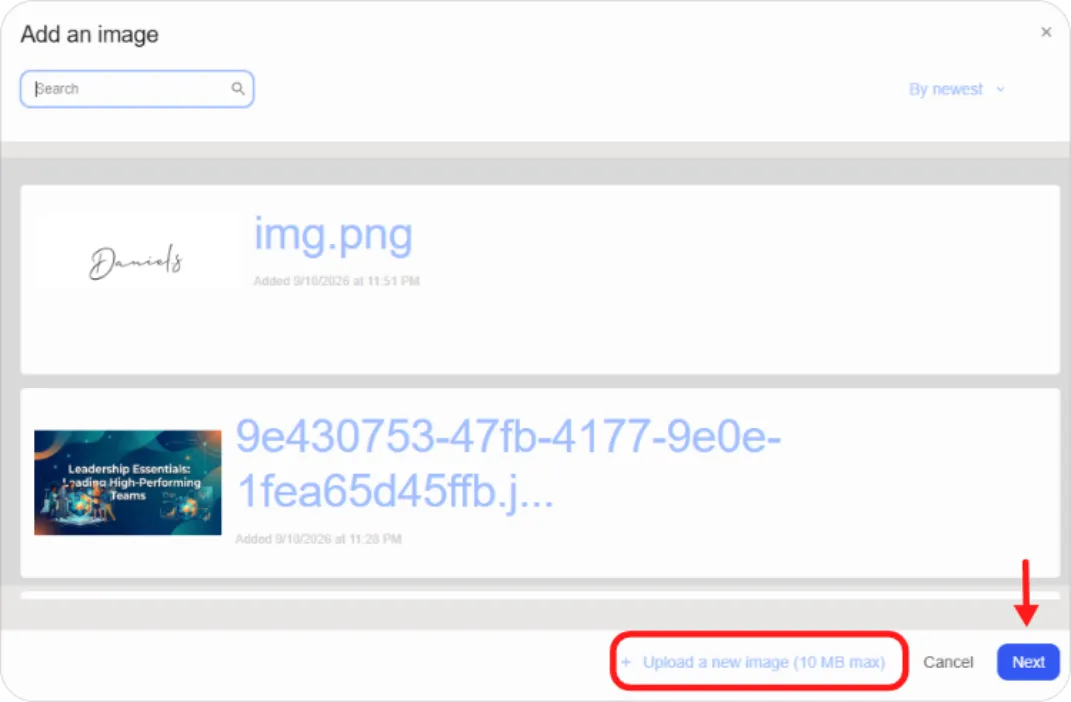
In Add an image, pick an image from the course’s assets, or click + Upload a new image (10 MB max) to add one.
-
Click Next.
-
In Image Settings:
-
Set the Image Dimensions. The lock icon keeps the aspect ratio.
-
Enter alt text describing the image, or tick This image is decorative (no alt text required) if it carries no meaning.
-
-
Click Save.
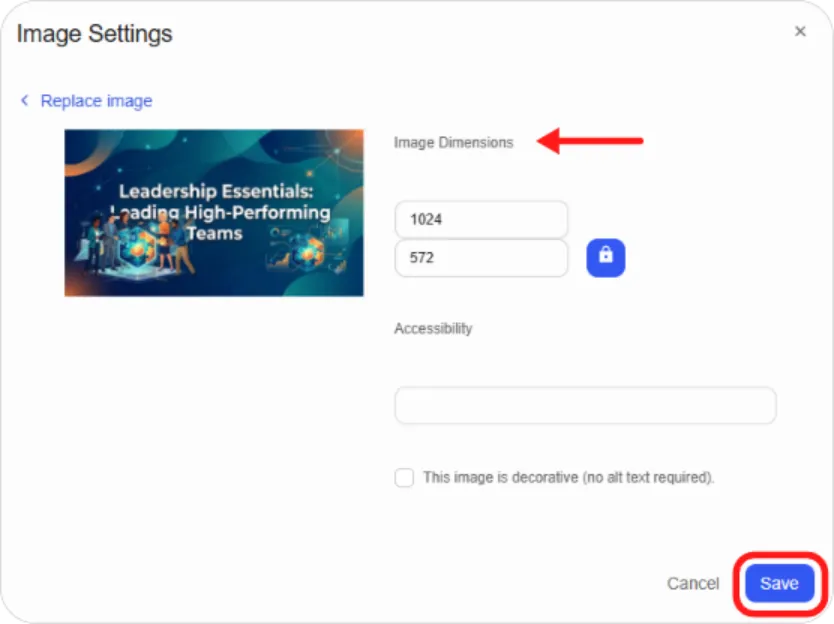
Tip: Only tick “decorative” for images that are genuinely ornamental. If an image carries information, alt text is what makes that information available to learners using a screen reader.
Images added this way are stored in the course’s assets automatically, so you don’t need to upload them separately first.
Other components that use assets
-
Video — select from the platform library or paste an MP4 URL.
-
PDF — point it at a file’s URL from either asset area.
-
Textbooks — upload the chapter PDF or paste its Studio path.
-
SCORM and H5P — upload packages directly in the component.
Studio URL and Web URL
Section titled “Studio URL and Web URL”Most assets offer both. They aren’t interchangeable.
Studio URL is an internal path that looks like this:
/asset-v1:BD+DM010+2026_May+type@asset+block@WHO_CREATED_US.jpg
Use it inside course content: component fields, the Textbooks PDF field, and image sources in raw HTML. Because it’s a platform path rather than a fixed address, it survives course export and import.
Web URL is a full public link. Use it when you need to reach the file from outside the course, or when a tool requires a complete address.
Tip: Inside course content, prefer the Studio URL. Web URLs pointing at course files can break when a course is copied or re-run.
Choosing where to put a file
Section titled “Choosing where to put a file”-
A video you’ll use in several courses → Authoring > Assets.
-
A reference document the AI Tutor should know about → Authoring > Assets, with Add to Knowledge Base switched on.
-
An image for one specific lesson → upload it from inside the Text component; it lands in the course’s assets automatically.
-
A handout that only makes sense in this course → course Assets.
What’s next
Section titled “What’s next”-
Put videos and images into your units: Adding Content Components
-
Build a multi-chapter reference document: Enhancing Your Course with Advanced Content
-
Generate a course from an uploaded document: How to Create a Course with AI Studio